QGIS Plugin for WRF: GIS4WRF

In this blog, I'd like to introduce you to a fantastic tool known as GIS4WRF. It is a QGIS plugin used to implment the Advanced Research Weather Research and Forecasting (WRF) model workflow on our personal machines. WRF is a state-of-the-art mesoscale numerical weather prediction system designed for both atmospheric research and operational forecasting applications.
GIS4WRF can be used to configure and run WRF Pre-Processing System (WPS) and WRF programs interactively. It is very helpful for pre-processing, configuring domains, running WPS and WRF, and visualizing simulation results on your local machine. It provides pre-compiled binaries. It allows us to easily download geographical data and meteorological data used by the WRF Model. It also populates the namelists from the dataset.
It incorporates QGIS mapping functionality to visualize the WPS (geogrid, ungrid, and metgrid) and WRF (real and WRF) workflow processes. I found it useful for conducting simulation experiments, and testing physics and dynamics options that didn't require a lot of computational power.
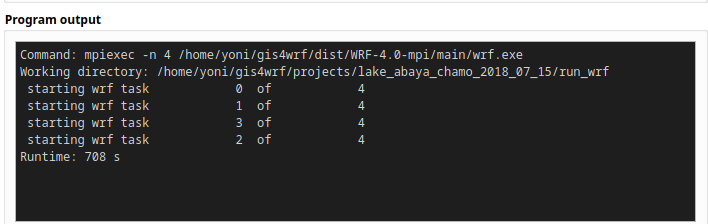
In this example, we run the WRF model for a 24-hour period (7/8/2020:12:00 PM–7/9/2020:7:00 AM) centered at Arba Minch, Ethiopia, using the default physics and dynamic options. The initial and boundary conditions for the simulation are provided by the NCEP GDAS/FNL 6-hour dataset. To run this case, it takes 708 seconds (11.8 minutes) on my personal laptop (4 CPUs at 3.000 GHz), but it may differ on other machines.
Detail information on the GIS4WRF can be found at the https://gis4wrf.github.io/
Installation, configuration, and running the WPS and WRF programs using the GIS4WRF-QGIS Plugin
Installation of GIS4WRF QGIS Plugin
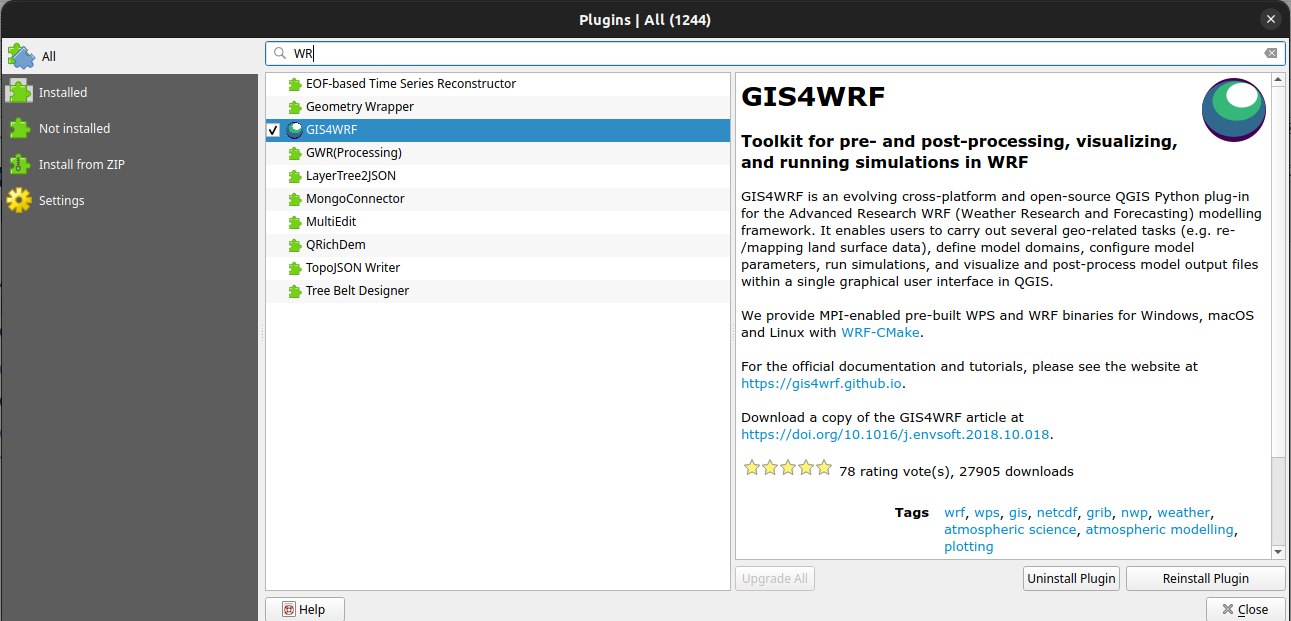
The installation of GIS4WRF is a straightforward. Go to Plugins ➡️ Manage and Install Plugins..., on the left side you will see list of all plugins available for QGIS, search for GIS4WRF and press the Install Plugin button.
Configuration of GIS4WRF QGIS Plugin
To configure GIS4WRF within QGIS: Go to the Settings➡️ Option...➡️ GIS4WRF` menu in QGIS.

Here you can configure:
1) Working directory for your GIS4WRF projects.
2) Enable integration with WPS/WRF.
3) Download pre-built WPS/WRF binaries.
4) Enable integration with NCAR’s Research Data Archive.
Set Working Directory
The GIS4WRF working directory is used for
storing GIS4WRF projects,
datasets
pre-compiled WRF/WPS binaries.
Make sure that you have enough space and have set the correct permissions for the default working directory.

Enable integration with WPS and WRF
The WRF Pre-Processing System (WPS) is a collection of Fortran and C programs that provides data used as input to the real.exe program. There are three main programs and a number of auxiliary programs that are part of WPS.
The three main programs are:
geogrid.exe
Defines the model horizontal domain
Horizontally interpolates static data to the model domain
Output conforms to the WRF I/O API
ungrib.exe
Decodes Grib Edition 1 and 2 data
Uses tables to decide which variables to extract
Supports isobaric and generalized vertical coordinates
Output is in a non-WRF-I/O-API form, referred to as an intermediate format
metgrid.exe
Ingest static data and raw meteorological fields
Horizontally interpolate meteorological fields to the model domain
Output conforms to WRF I/O API
There are two options to run the WPS and WRF on your machine:
1) You can use the pre-compiled WPS and WRF binaries prepared by the GIS4WRF.
2) If you have your own WPS and WRF binaries set the path of the WPS and WRF directory.
This can be done in the WPS/WRF distribution section and first you have to install MPI in your system. On Linux system you can install it using the following command:
sudo apt-get update && sudo apt-get install mpich
Make sure you check the MPI box
Set the number of MPI processors that matches your processors.
To use the pre-compiled WPS and WRF binaries prepared by GISWRF plugin first click the
Download Pre-Compiled WPS Distribution...and when completed click theDownload Pre-Compiled WRF Distribution...button.

Integration with NCAR’s Research Data Archive
The integration with NCAR’s Research Data Archive through the GIS4WRF Met data downloader are needed to download the following two dataset:
Geographical data used by the WRF Preprocessing System (WPS),
Meteorological data used to create initial and boundary conditions.

First you need to create account at the https://rda.ucar.edu/index.html?hash=data_user&action=register and put these login information (username and password) at the NCAR’s Research Data Archive section as shown in the above image. Finally click OK to save all changes and restart the QGIS.
Detail information on the configuration can be found at https://gis4wrf.github.io/configuration/
Running WRF
The GIS4WRF has three main tabs Datasets, Simulation, and View. To successfully run WRF simulations/experiments on your local machine using GIS4WRF, the following steps are mandatory.
1) Create project
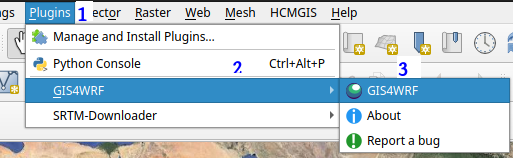
Start by launching QGIS ➡️ Plugins➡️ GIS4WRF.
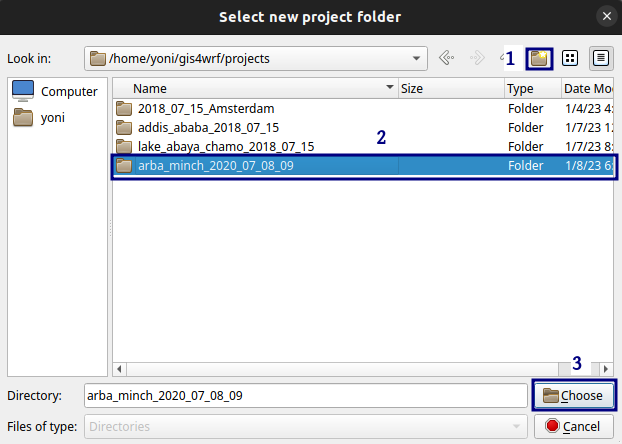
Create a new GIS4WRF project by going to Simulation➡️ General➡️ Create a GIS4WRF Project.
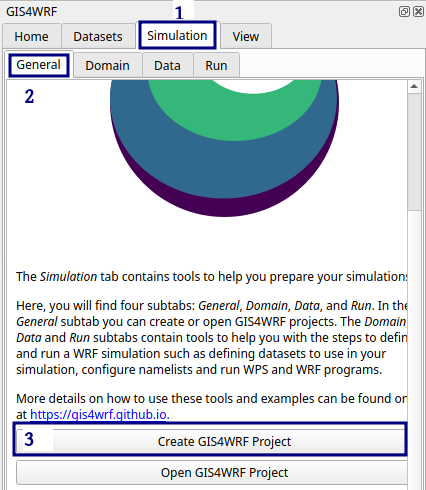
The General tab is used to create a new project or open an existing GIS4WRF project. By default a project is created inside the GIS4WRF default working directory. This will open a new window. Create a new folder named arba_minch_2020_07_08_09 and click on Choose.
Define domain
GIS4WRF defines domains from the inside out. This allows you to have full control on positioning the inner-most domain.
It is advisable to set the extent of the datasets first in-order to reduce the amount of data to be download. GIS4WRF allow to easily create, import, and export WRF domains through a GUI interface.
This configuration will be used to generate the relevant sections in namelist.wps and namelist.wrf. Namelist are inputs to the main programs.
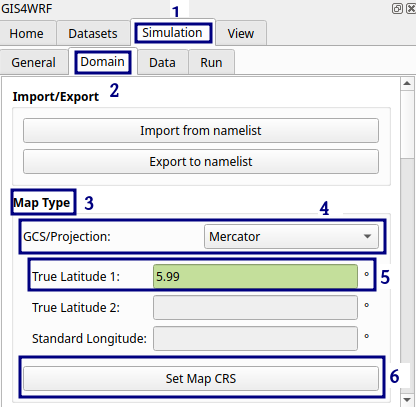
Navigate to Simulation ➡️ Domain➡️ Map Type and fill the sections as follows:
Select coordinate System (GCS) or Projection
GCS/Projection:
MercatorTrue Latitude 1:
5.99Click on
Set Map CRS
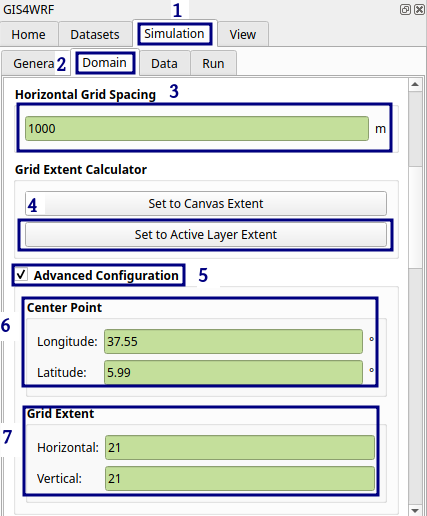
Set the Horizontal Grid Spacing: 1000 m:
Enable (tick) Advanced Configuration
- Center Point Longitude:
37.55 - Center Point Latitude:
5.99
Grid Extent
- Grid Extent (Horizontal):
21 - Grid Extent (Vertical):
21
Enable (tick) Parenting
- Number of Parenting:
1 Parent 1: Child-to-Parent Ratio:3- Padding (Top, Right, Bottom, Left):
10 Parent 2: Child-to-Parent Ratio:3- Padding (Top, Right, Bottom, Left):
10

You can view the domain layers individually by clicking and expanding the WRF domain vector and grid groups in the QGIS panel. The WRF Domain Vector layers with 2 domains. 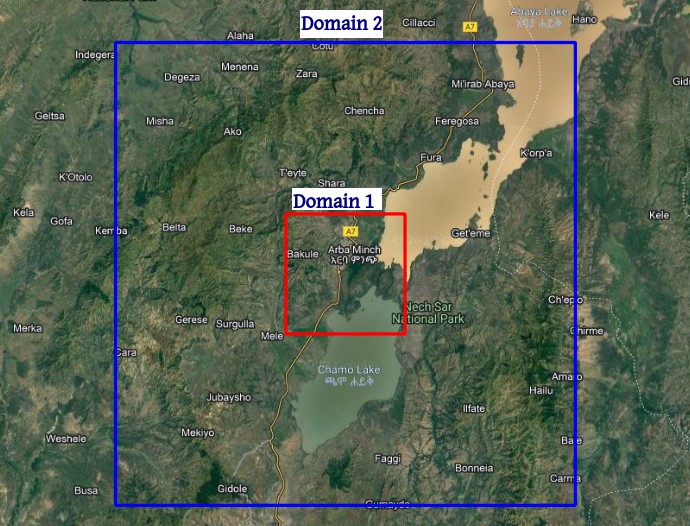
The WRF Domain Raster layers with 2 domains. 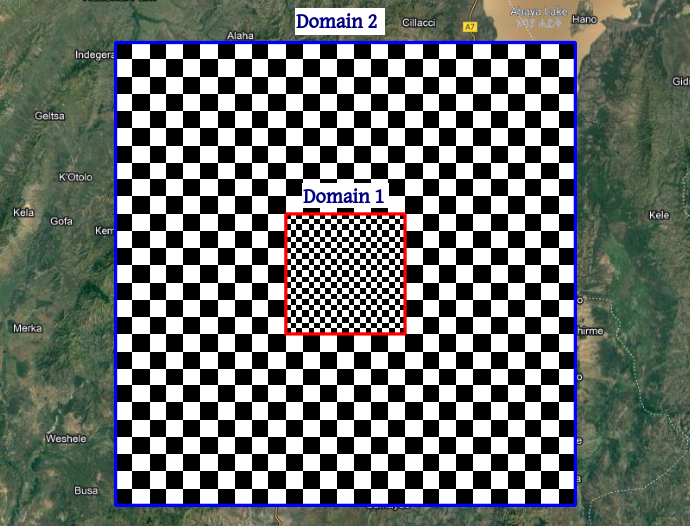
Download input data
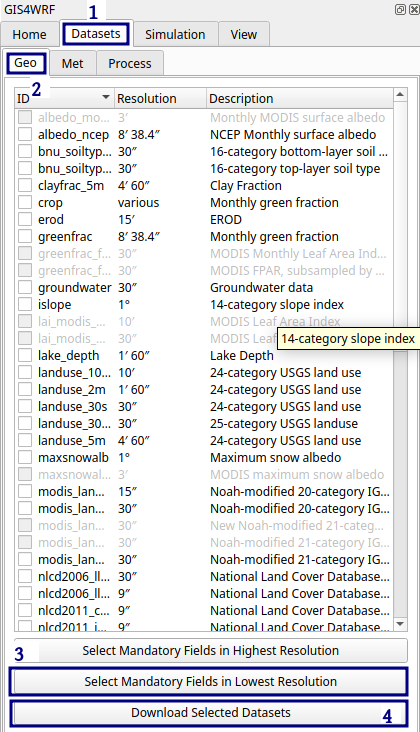
- Geographical data
Navigate to Dataset ➡️ Geo. Click on Select Mandatory Fields in Lowest Resolution and Download Selected Datasets. The lowest resolution fields are useful for model testing and educational purposes.
When the process is complete, you will receive a message indicating that the data was successfully downloaded.
- Meteorological data
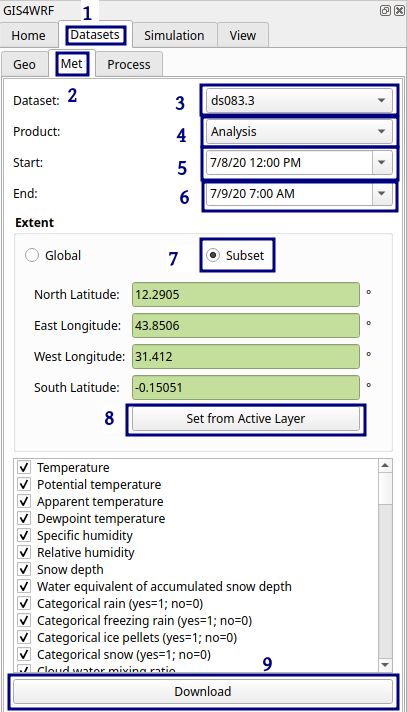
To download the meteorological data navigate to Dataset➡️ Met and select:
- Dataset:
ds083.3 - Product:
Analysis - Start:
7/8/20 12:00 PM - End:
7/9/20 7:00 AM
Under Extent click on subset, then select Domain 2 on the Layers panel of QGIS and click on Set from Active Layer to subset your request. Finally, click Download to submit and download your request.
When the process is complete, you will receive a message indicating that the data was successfully downloaded.
Select input data
GIS4WRF automatically pre-populates WPS and WRF namelists based on your domain configuration and data selection.
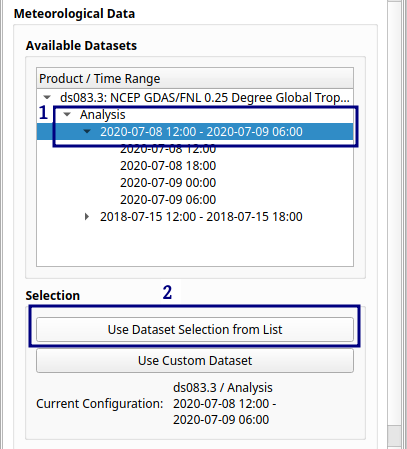
Go to Simulation➡️ Data. As you already have downloaded geographical and meteorological data, simply type lowres in the Domain 1 and Domain 2 fields.

Click on 2020-07-08 12:00 - 2020-07-09 06:00 and Use Dataset Selection from List to select the meteorological data. It will show the current configuration period
Configure and run
There are two main processes involved in running a real-case simulation:
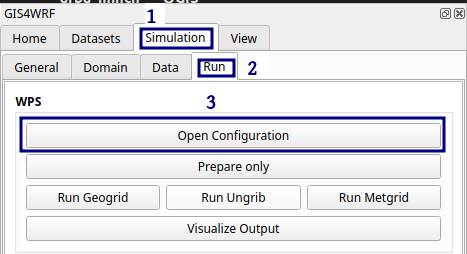
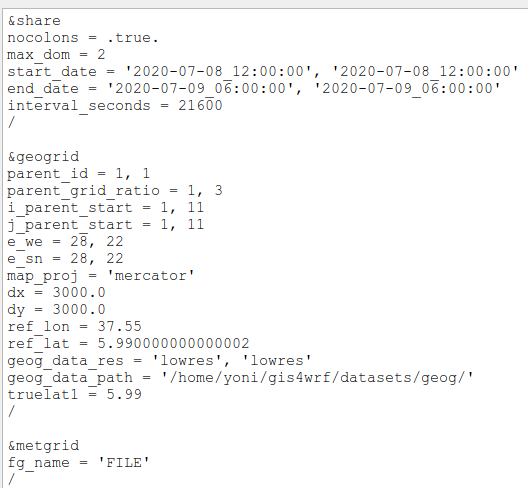
To view the default configuration, Go to Simulation➡️ Run, and click on Open configuration and it will display the general setting of thenamelist.wps.
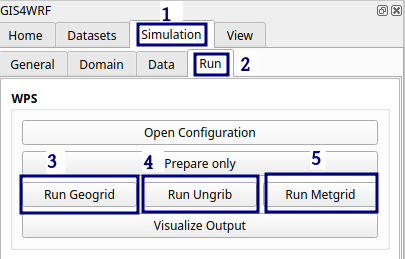
1) To configure and run the WRF Preprocessing System (WPS), the following three programs must be successfully run: Geogrid, Ungrib, and Metgrid.
Go to Simulation➡️ Run and click on the Geogrid➡️ Ungrib ➡️ Metgrid buttons individually.
 All the programs must finish without errors.

2) To configure and run the WRF: there are two programs you will need to run:
Real
WRF
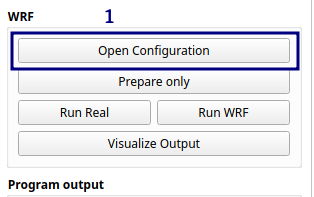
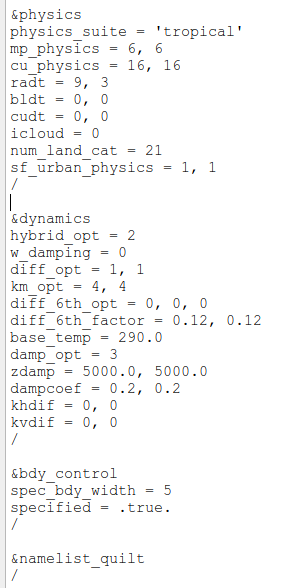
GIS4WRF already pre-populates most of the namelist used by Real and WRF (namelist.input) for you, however it will not select physics and dynamics options for you by design, as a result you need to set the correct physics and dynamics options for your particular experiment. You can click on Open configuration and replace all values in the configuration with your own namelist.input.
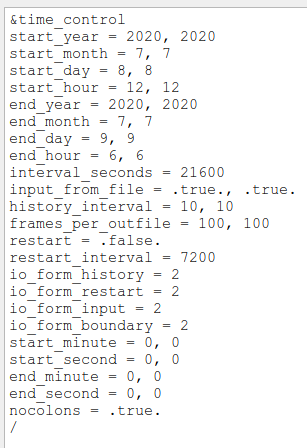
Time Control
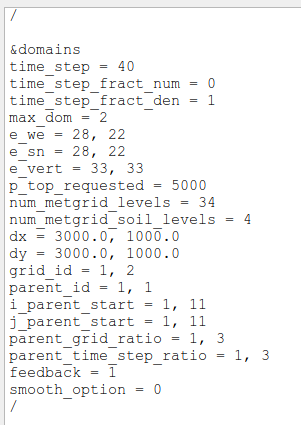
Domains
 |
|
Physics and Dynamics
Now you are good to go, run Real and WRF .
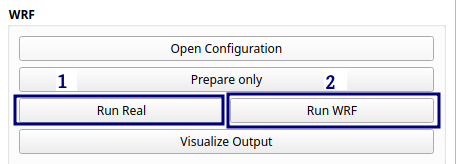
First click on Run Real and Run WRF. The Run program creates the initial condition for the both domains and boundary condition data for the outer domain. Both program should complete without errors. To run this case it takes 708 seconds (11.8 min) in my laptop it may differ on other machines.
View results
After the simulation is complete, click on Visualize Output to select the the WRF output files wrfout_d01_2015-07-08_12_00_00 and click Open.
| Visualize Open | Open WRF NetCDF File |
|---|---|
 | 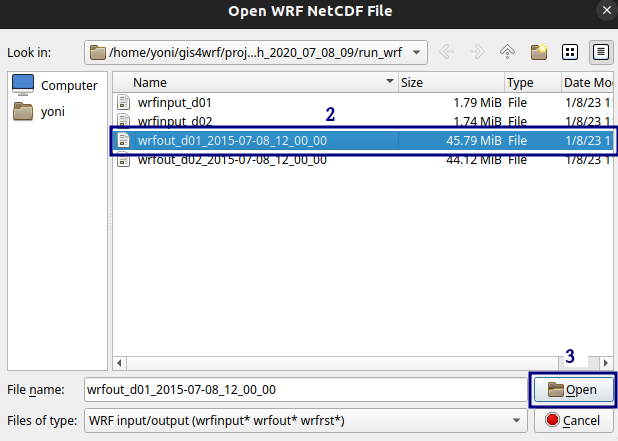 |
WRF NetCDF datasets can also be opened under QGIS➡️ Layers ➡️ Add Layer ➡️ Add WRF NetCDF Layer. Variables included in WRF NetCDF datasets are shown as a list in the View tab. You can view the simulation output as follow:
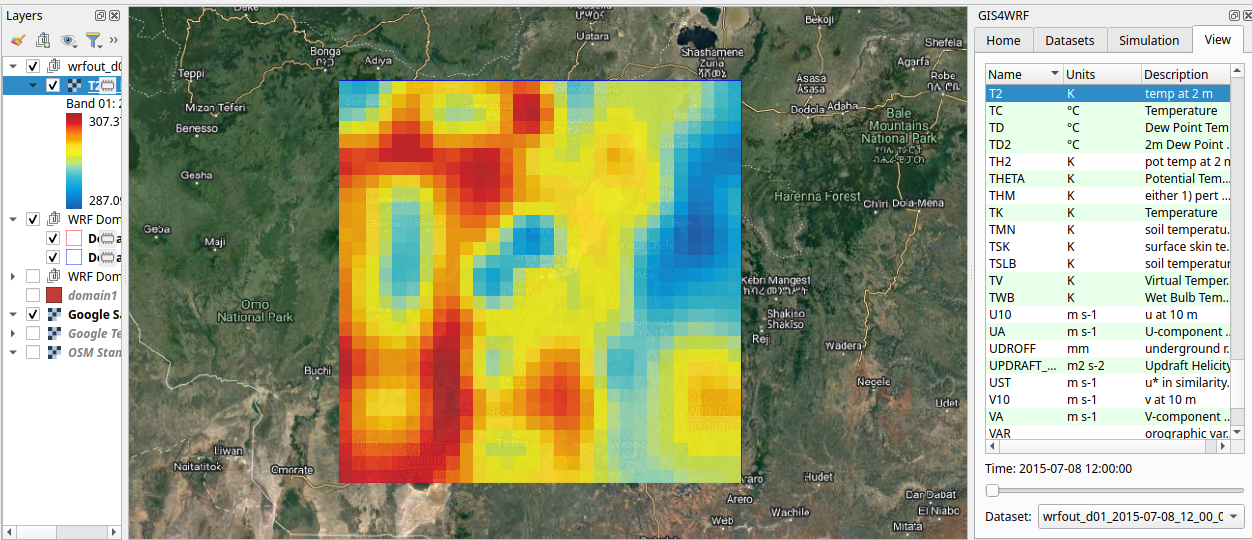
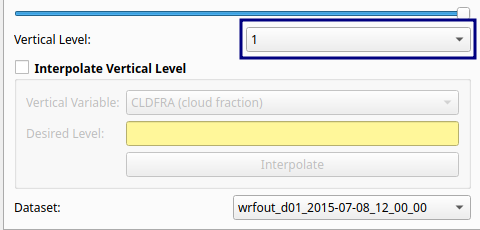
The time slider at the end of the list of variables provides a fast way to slice through different time stamps. For variables that include vertical levels, the vertical level drop down menu will become selectable.
🥇You have successfully run the WPS and WRF programs on your personal machine using the QGIS-GISWRF plugin. 🥇
Reference:
Meyer, D., & Riechert, M. (2019). Open source QGIS toolkit for the Advanced Research WRF modelling system. Environmental Modelling & Software, 112, 166–178. https://doi.org/10.1016/j.envsoft.2018.10.018
Meyer, D., & Riechert, M. (2018). The GIS4WRF Plugin. Zenodo. https://doi.org/10.5281/zenodo.1288569
Leave a Comment