
Installing, Porting & Running Community Earth System Model

Required libraries & packages
Model Source: https://www.cesm.ucar.edu/models/cesm2/?ref=hpb
These are the libraries and compilers required for CESM.
Unix-like operating system (Linux: Ubuntu)
Git version 1.8 or newer
Apache Subversion
Basic important package
C, C++, & Fortran compilers (GNU compilers)
Perl, C-make, G-make, automake, python etc.
ZLIB library
HDF library
netCDF-C library
netCDF-Fortran library
Parallel-NetCDF (PnetCDF) library
LAPACK and BLAS libraries (Linear Algebra Package)
MPI environment (MPICH2 )
Installing Basic Package
# Go to home directory
cd ~

# Updating the packages list
sudo apt update && sudo apt upgrade -y

sudo apt install gcc g++ gfortran libtool automake autoconf \
make m4 default-jre default-jdk csh ksh tcsh okular cmake time \
xorg openbox xauth git python3 python3-dev python2 python2-dev \
cmake mlocate perl
GIT Installation
Git is a free & open source distributed version control system (VCS).
sudo apt install git
sudo apt install git-core

# To check the version of Git
git --version

Output:
git version 2.34.1
Apache Subversion Installation
# Install Apache HTTP Web server
sudo apt install apache2 apache2-utils -y

# Start the Apache service
sudo systemctl start apache2

# Enable the service to start on system boot
sudo systemctl enable apache2

# Install all required dependencies
sudo apt-get install libapache2-mod-svn subversion-tools libsvn-dev -y

# Install Subversion
sudo apt install subversion -y

# Enable Apache modules to run SVN
sudo a2enmod dav
sudo a2enmod dav_svn

# Restart the Apache service
sudo systemctl restart apache2
Downloading & Installing Main Libraries
# Go to home directory
cd $HOME

# Make Installation directories
mkdir -p CESM/Downloads/
mkdir -p CESM/Libs/

# Set Installation Path
export ZLIBDIR=$HOME/CESM/Libs/zlib-1.2.12
export HDF5DIR=$HOME/CESM/Libs/hdf5-1_12_2
export NETCDFCDIR=$HOME/CESM/Libs/netcdf-c-4.9.0
export NETCDFFDIR=$HOME/CESM/Libs/netcdf-fortran-4.6.0
export PNETCDFDIR=$HOME/CESM/Libs/pnetcdf-1.12.3
export MPICHDIR=$HOME/CESM/Libs/mpich-4.0.2
Download & Install ZLIB
# Downloading zlib
cd $HOME/CESM/Downloads/
wget -c -4 https://github.com/madler/zlib/archive/refs/tags/v1.2.12.tar.gz

# Unpack the tar file
tar -xvzf v1.2.12.tar.gz
cd zlib-1.2.12/

# Configure and Install Zlib
CC= CXX= ./configure --prefix=$ZLIBDIR
make
make install
make check
Download & Install HDF5
# Downloading HDF5
cd $HOME/CESM/Downloads/
wget -c -4 https://github.com/HDFGroup/hdf5/archive/refs/tags/hdf5-1_12_2.tar.gz

# Unpack the tar file
tar -xvzf hdf5-1_12_2.tar.gz
cd hdf5-1_12_2

# Setting the environment
CPPFLAGS="-I$ZLIBDIR/include""
LDFLAGS="-L$ZLIBDIR/lib""

# Configure and Install HDF5
./configure --prefix=$HDF5DIR --with-zlib=$ZLIBDIR --enable-hl --enable-fortran
make
make install
make check
Download & Install netCDF-C
# Downloading netCDF
cd $HOME/CESM/Downloads/
wget -c -4 https://github.com/Unidata/netcdf-c/archive/refs/tags/v4.9.0.tar.gz

# Unpack the tar file
tar -xzvf v4.9.0.tar.gz
cd netcdf-c-4.9.0/

# Setting the environment
CPPFLAGS="-I$HDF5DIR/include -I$ZLIBDIR/include""
LDFLAGS="-L$HDF5DIR/lib -L$ZLIBDIR/lib""

# Configure and Install netCDF-C
./configure --prefix=$NETCDFCDIR --disable-dap
make
make install
make check

# Check netCDF-C installation parameters
nc-config --version
nc-config --all
Download & Install netCDF-Fortran
# Downloading netCDF-fortran
cd $HOME/CESM/Downloads/
wget -c -4 https://github.com/Unidata/netcdf-fortran/archive/refs/tags/v4.6.0.tar.gz

# Unpack the tar file
tar -xvzf v4.6.0.tar.gz
cd netcdf-fortran-4.6.0/

# Setting the environment
LD_LIBRARY_PATH=$NETCDFCDIR/lib:$LD_LIBRARY_PATH
CPPFLAGS="-I$NETCDFCDIR/include"
LDFLAGS="-L$NETCDFCDIR/lib"

# Configure and Install netCDF-fortran
./configure --prefix=$NETCDFFDIR --disable-shared
make
make install
make check

# Check netCDF fortran installation parameters
nf-config --all
Download & Install PnetCDF
# Downloading PnetCDF
cd $HOME/CESM/Downloads/
wget -c -4  https://parallel-netcdf.github.io/Release/pnetcdf-1.12.3.tar.gz

# Unpack the tar file
tar -xvzf pnetcdf-1.12.3.tar.gz
cd pnetcdf-1.12.3

# Setting the environment
export MPICC=mpicc
export MPICXX=mpicxx
export MPIFC=mpifort
CC=$MPICC
CXX=$MPICXX
FC=$MPIFC
F77=$MPIFC

# Configure and Install PnetCDF
./configure --prefix=${PNETCDFDIR} --enable-shared --enable-fortran --enable-profiling --enable-large-file-test
make
make tests
make check
make ptest
make ptests
make install
Download & Install MPICH
# Downloading MPICH
cd $HOME/CESM/Downloads/
wget -c -4 https://github.com/pmodels/mpich/releases/download/v4.0.2/mpich-4.0.2.tar.gz

# Unpack the tar file
tar -xvzf mpich-4.0.2.tar.gz
cd mpich-4.0.2/

# Configure and Install MPICH
F90= ./configure --prefix=$MPICHDIR --with-device=ch3 FFLAGS=$fallow_argument FCFLAGS=$fallow_argument
make
make install
make check
Download & Install LAPACK & BLAS
# Download the lapack package
cd ~
sudo wget htps:github.com/Reference-LAPACK/lapack/archive/v3.9.0.tar.gz

# Unpack the tar file
sudo tar -xzvf lapack-3.9.0.tar.gz

# Open folder in ~/lapack-3.9.0/
cd lapack-3.9.0

# Copy the make.inc.example into make.inc
sudo cp make.inc.example make.inc

# Install the blaslib and lapacklib library
sudo make blaslib
sudo make lapacklib

# Make a link:
sudo ln -s $HOME/lapack-3.9.0/librefblas.a /usr/local/lib/libblas.a
sudo ln -s $HOME/lapack-3.9.0/liblapack.a /usr/local/lib/liblapack.a
Getting the CESM Model Source Code
cd ~
# In case python is not install
# sudo apt install python-is-python3

# Clone the CESM repositoy using git:
git clone https://github.com/escomp/cesm.git my_cesm_sandbox

# This will create a directory my_cesm_sandbox/ in your current working directory.
# Go to the my_cesm_sandbox folder
cd my_cesm_sandbox

# Select what version of CESM you want
# To see what CESM tags are available:
# First view the available  CESM versions:
git tag

# To view CESM2 relases
git tag --list 'release-cesm2*'

# release-cesm2.0.0
# release-cesm2.0.1
# release-cesm2.1.0
# release-cesm2.1.1
# release-cesm2.1.2
# release-cesm2.1.3
# release-cesm2.2.0

# Checkout the latest CESM production release of CESM2 'release-cesm2.1.3'
git checkout release-cesm2.1.3

# acquire all the model components from my_cesm_sandbox:
# To download of all components od CESM, you can run checkout_externals
./manage_externals/checkout_externals

 # you can run checkout_externals with the status flag to show the status of the externals: (Optional)
./manage_externals/checkout_externals -S

# If there are problems, you might see something like:
e-  ./components/cam

# At this point you have a working version of CESM.
# if there was an unexpected interruption while downloading.
# First try rerunning ./manage_externals/checkout_externals
# If there is still a problem, try running with logging turned on:

./manage_externals/checkout_externals --logging

# Get the version of CESM
./describe_version
git describe
Porting & validating CESM to your local machine/Laptop
The contents of the configuration files must correspond to the information on the target machine. To accomplish this, we must edit the config_machines.xml and config_compilers.xml files.
Navigate to the location of these files and make the changes to the contents listed below. The specific details are provided below.
These two files are found at:
cd $HOME/my_cesm_sandbox/cime/config/cesm/machines/
config_machines.xml file
MACH: is the name of your machine.
DESC: a text description of the machine. You can give your machine description here
NODENAME_REGEX: a regular expression used to identify the machine and must agree with compute nodes as well as login nodes
OS: the machine operating system
COMPILERS: compilers supported on the machine
MPILIBS: mpilibs supported on the machine
The machine & operating system name can be retrieved by running the following command in the terminal:
cat /etc/os-release
# or
hostnamectl
# Example
<machine MACH="yoni-elitebook">
<DESC>yoni-elitebook machine, os is Linux, 4 pes/node  </DESC>
<NODENAME_REGEX>yoni-elitebook</NODENAME_REGEX>
<OS>LINUX</OS>
<COMPILERS>gnu</COMPILERS>
<MPILIBS>mpich</MPILIBS>
Directories
CIME_OUTPUT_ROOT: the base directory where the build and run directories are writtenDIN_LOC_ROOT: location of the input data directoryDIN_LOC_ROOT_CLMFORC: location of the atmospheric forcingDOUT_S_ROOT: root directory of short-term archive filesBASELINE_ROOT: root directory for system test baseline filesCCSM_CPRNC: location of the cprnc tool
First, create the required directories
mkdir $HOME/projects/cesm/scratch
mkdir $HOME/projects/cesm/inputdata
mkdir $HOME/projects/projects/cesm/inputdata/atm/datm7
mkdir $HOME/projects/cesm/archive/case
mkdir $HOME/projects/cesm/baselines
export CIMEROOT=$HOME/my_cesm_sandbox/cime
mkdir $CIMEROOT/tools/cprnc/build/cprnc
Then, replace the paths as required
<CIME_OUTPUT_ROOT>$ENV{HOME}/projects/cesm/scratch</CIME_OUTPUT_ROOT>
<DIN_LOC_ROOT>$ENV{HOME}/projects/cesm/inputdata</DIN_LOC_ROOT>
<DIN_LOC_ROOT_CLMFORC>$ENV{HOME}/projects/cesm/inputdata/atm/datm7</DIN_LOC_ROOT_CLMFORC>
<DOUT_S_ROOT>$ENV{HOME}/projects/cesm/archive/case</DOUT_S_ROOT>
<BASELINE_ROOT>$ENV{HOME}/projects/cesm/baselines</BASELINE_ROOT>
<CCSM_CPRNC>$CIMEROOT/tools/cprnc/build/cprnc</CCSM_CPRNC>
GMAKE_J: number of threads to pass to the gmake flag
BATCH_SYSTEM: batch system used on this machine
SUPPORTED_BY: contact information for support for this system
MAX_TASKS_PER_NODE: maximum number of threads/tasks per shared memory node on the machine
MAX_MPITASKS_PER_NODE: number of physical PES per shared node on the machine
mpirun: The mpi exec to start a job on this machine.
module_system: How and what modules to load on this system
<GMAKE_J>4</GMAKE_J>
      <BATCH_SYSTEM>none</BATCH_SYSTEM>
      <SUPPORTED_BY>Yonas</SUPPORTED_BY>
      <MAX_TASKS_PER_NODE>4</MAX_TASKS_PER_NODE>
      <MAX_MPITASKS_PER_NODE>4</MAX_MPITASKS_PER_NODE>
      <mpirun mpilib="default">
	<executable>mpiexec</executable>
	<arguments>
	  <arg name="anum_tasks"> -np $TOTALPES</arg>
	  <arg name="labelstdout">--prepend-rank</arg>
	</arguments>
      </mpirun>
      <module_system type="none"/>
   </machine>
Check & confirm the machine configurations
cd $HOME/my_cesm_sandbox/cime/

xmllint --noout --schema cime/config/xml_schemas/config_machines.xsd \
$HOME/my_cesm_sandbox/cime/config/cesm/machines/config_machines.xml

# Expected result:
$HOME/my_cesm_sandbox/cime/config/cesm/machines/config_machines.xml validates
config_compilers.xml file
COMPILERS: compilers supported on the machine
MACH: is the name of your machine.
CPPDEFS: defines the file containing the C-pre-processing options
LDFLAGS: defines the linker flag
SCC: defines the *C *compiler
SFC: defines the Fortran compiler
SCXX: defines the C++ compiler
MPICC: defines the MPI C compiler
MPIFC: defines the MPI Fortran compiler
MPICXX: defines the MPI C++ compiler
CXX_LINKER: defines the fortran C++ linker
NETCDF_PATH: directory of the netCDF program
PNETCDF_PATH: directory of the parallel netCDF program
SLIBS: netCDF-C & netCDF-fortran libraries are given here here
Your config_compilers.xml file must contain the following information:
<compiler COMPILER="gnu" MACH="yoni-elitebook">
      <!-- LINUX -->
      <CPPDEFS>
	<append>-DFORTRANUNDERSCORE -DNO_R16</append>
      </CPPDEFS>
      <LDFLAGS>
	<append compile_threaded="true"> -fopenmp </append>
      </LDFLAGS>
      <SFC>gfortran</SFC>
      <SCC>gcc</SCC>
      <SCXX>g++</SCXX>
      <MPIFC>mpif90</MPIFC>
      <MPICC>mpicc</MPICC>
      <MPICXX>mpicxx</MPICXX>
      <CXX_LINKER>FORTRAN</CXX_LINKER>
      <SUPPORTS_CXX>TRUE</SUPPORTS_CXX>
      <NETCDF_PATH>$HOME/CESM/Libs/netcdf-c-4.9.0</NETCDF_PATH>
      <PNETCDF_PATH>$HOME/CESM/Libs/pnetcdf-1.12.3</PNETCDF_PATH>
      <SLIBS>
	<append>-L$HOME/CESM/Libs/netcdf-c-4.9.0/lib -lnetcdff
    -L$HOME/CESM/Libs/netcdf-c-4.9.0/lib -lnetcdf -lnetcdf -lm
    </append>
    <append>-L/usr/local/lib/ -llapack -L/usr/local/lib/ -lblas</append>
      </SLIBS>
   </compiler>
Check & confirm the compiler configuration
cd $HOME/my_cesm_sandbox/cime/

xmllint --noout --schema cime/config/xml_schemas/config_compilers.xsd \
HOME/my_cesm_sandbox/cime/config/cesm/machines/config_compilers.xml

# Expected result:
$HOME/my_cesm_sandbox/cime/config/cesm/machines/config_compilers.xml validates
Make a Test Run
# Move to the script directory
cd $Home/my_cesm_sandbox/cime/scripts

# Step1: Create a case
./create_newcase --case /home/yoni/projects/cesm/scratch/testrun \
--compset QPC4 --res f45_f45_mg37 --run-unsupported

# This is a 'simple climate simulation': known as aquaplanet
# configuration at 4.5-degree resolution, using CAM4 physics.
# It is much less computationally intensive run,
# so it works well for this tutorial, only ~0.6GB of RAM required.

# Move to the build and run directory
cd $HOME/projects/cesm/scratch/testrun

# Generate a 3-day simulation for test purposes only
./xmlchange STOP_OPTION=ndays,STOP_N=3

# Step2: Setting up the case
./case.setup

# This steps creates a namelists that controls the model behavior,
# creates the directory where the run happens, and configures additional
# settings used by the the model.

# Step3: Building the model
./case.build

# This step build, compile & creates the executable files of the model.
# It may take ~3-6 minutes

If you get this output:
`MODEL BUILD HAS FINISHED SUCCESSFULLY`
# Almost finished 😎

# Step4: Running the model
./case.submit

# The output files will be written in the archive directory
"$HOME/projects/cesm/archive/case/atm/hist/"

# These last step validates all the input data required by the 3-daya
# model configurations, download if there are any missing data,
# and run the simulation.

# Congratulations!, If the CESM model was successfully completed 🎉⭐🎉
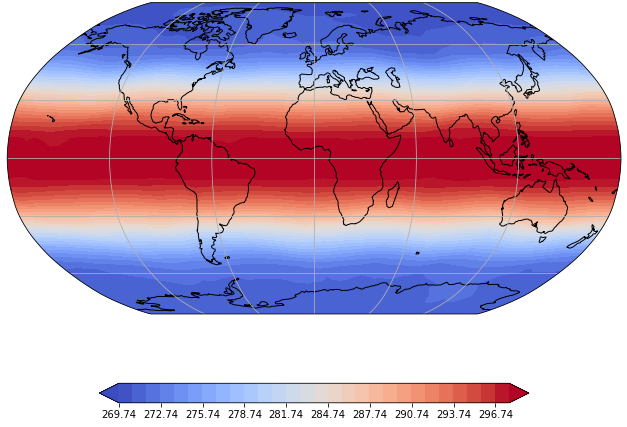
CESM Model Output
Displaying the global surface temperature in Kelvin @ January 2001 00:00:00
Well done! 🥇🥇🥇 Your feedback is greatly appreciated!!!
Leave a Comment